Razorpay Payment in Android

RazorPay provides online payment services to big and small offline businesses. Razor Pay allows for different debit cards, credit card net banking, wallet, and UPI payments in mobile application integration. Customers pay for different businesses like food, home services, etc. 

In this article, we will take a look at the implementation of RazorPay in Android applications.

Step-By-Step Implementation.


Step 1: Create a new project in Android app development or you can use an already created project.


Step 2: Add dependency of razor pay in build.gradle file on Gradle scripts>Build.gradle app module and add the below dependencies. 

implementation ("com.razorpay:checkout:1.6.38")  // add latest version of razorpay

Step 3: Add permission to the internet in app> Androidmanifest.xml file and below code.

<uses-permission android:name="android.permission.INTERNET" />

Step 4: Create an activity_main.xml file in the layout folder.

<?xml version="1.0" encoding="utf-8"?>

<androidx.constraintlayout.widget.ConstraintLayout xmlns:android="http://schemas.android.com/apk/res/android"

xmlns:app="http://schemas.android.com/apk/res-auto"

xmlns:tools="http://schemas.android.com/tools"

android:id="@+id/main"

android:orientation="horizontal"

android:layout_width="match_parent"

android:layout_height="match_parent"

tools:context=".MainActivity">


// Textview use for label 

<TextView

android:layout_width="wrap_content"

android:layout_height="wrap_content"

android:layout_marginTop="76dp"

android:text="Condidroot solutions"

android:textColor="@color/black"

android:textSize="20sp"

app:layout_constraintEnd_toEndOf="parent"

app:layout_constraintStart_toStartOf="parent"

app:layout_constraintTop_toTopOf="parent" />


// Textview use for label 

<TextView

android:id="@+id/txtmessage"

android:layout_width="wrap_content"

android:layout_height="wrap_content"

android:layout_marginTop="180dp"

android:text="Razorpay payment"

android:textColor="@color/black"

android:textSize="20sp"

app:layout_constraintEnd_toEndOf="parent"

app:layout_constraintHorizontal_bias="0.542"

app:layout_constraintStart_toStartOf="parent"

app:layout_constraintTop_toTopOf="parent" />


//Button is use to open razory payment 

<Button

android:id="@+id/btnPaymentGetway"

android:layout_width="wrap_content"

android:layout_height="wrap_content"

android:layout_marginTop="132dp"

android:text="Submit"

app:layout_constraintEnd_toEndOf="parent"

app:layout_constraintStart_toStartOf="parent"

app:layout_constraintTop_toBottomOf="@+id/txtmessage" />

</androidx.constraintlayout.widget.ConstraintLayout>

Step 5: Create a MainActivity.java file in your package name folder on your mobile application.

import android.annotation.SuppressLint;

import android.os.Bundle;

import android.widget.Button;

import androidx.activity.EdgeToEdge;

import androidx.appcompat.app.AppCompatActivity;

import com.razorpay.Checkout;

import org.json.JSONException;

import org.json.JSONObject;


public class MainActivity extends AppCompatActivity {

private Button btnPaymentGetway;

@SuppressLint("MissingInflatedId")

@Override

protected void onCreate(Bundle savedInstanceState) {

super.onCreate(savedInstanceState);

EdgeToEdge.enable(this);

setContentView(R.layout.activity_main);

btnPaymentGetway = findViewById(R.id.btnPaymentGetway);


//payment button Click listener

btnPaymentGetway.setOnClickListener(view -> {

Dopayment();

});


}

//This method is used to open razorpay payment getway

void Dopayment()

{

// rounding off the amount.

int amount = Math.round(Float.parseFloat("500.0") * 100);


// initialize Razorpay account.

Checkout checkout = new Checkout();


// set your id as below

checkout.setKeyID("Your key set here");


// set image

checkout.setImage(R.drawable.company_logo);


// initialize json object

JSONObject object = new JSONObject();

try {

// to put name

object.put("name", "Candidroot solutions");


// put description

object.put("description", "Test payment");


// to set theme color

object.put("theme.color", "");


// put the currency

object.put("currency", "INR");


// put amount

object.put("amount", amount);


// put mobile number

object.put("prefill.contact", "Your number");


// put email

object.put("prefill.email", "Your email address");


// open razorpay to checkout activity

checkout.open(MainActivity.this, object);

} catch (JSONException e) {

e.printStackTrace();

}

}

}

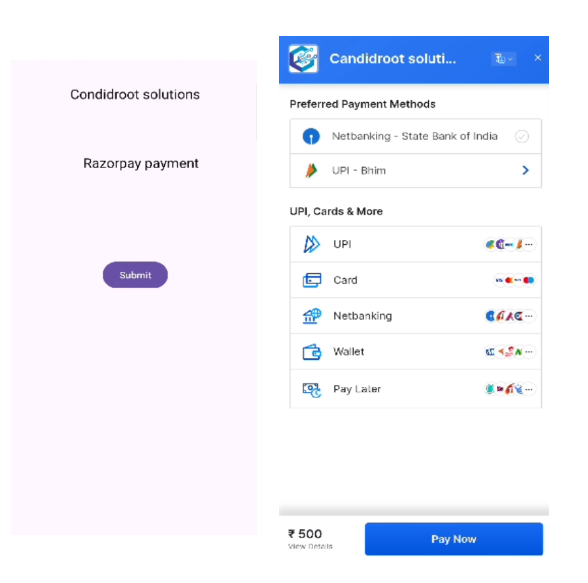
Step 6: Razorpay Payment Gateway Example:


Happy coding!


365Bloggy May 10, 2024
Share this post
Tags
SUBSCRIBE THIS FORM


Archive