Accessing websites, images, and files using QR codes. QR codes are used to make payments that are easy to use. Different apps are available For doing payment using QR like Gpay, phone, etc. so how to generate a QR code in the Flutter mobile application? Here is the step-by-step process.
QR code is one type of image that hides some text, URL, or any data. those data we can use.
The steps for adding the plugin to the flutter application.
Step 1 : Create a new project in the Flutter project or you can use an already created Flutter project.
Step 2 : Open “ pubspec.yaml” file the project. Add below line.
dependencies :
//depencies
qr_code_scanner: ^1.0.1
Step 3: Create a main.dart file in your lib folder.lib>main.dart
import 'package:flutter/material.dart';
import 'dart:developer';
import 'dart:io';
import 'package:flutter/foundation.dart';
import 'package:flutter/material.dart';
import 'package:qr_code_scanner/qr_code_scanner.dart';
void main() => runApp(const MaterialApp(home: MyHome()));
class MyHome extends StatelessWidget {
const MyHome({Key? key}) : super(key: key);
// defalut method called
@override
Widget build(BuildContext context) {
return Scaffold(
appBar: AppBar(title: const Text('Flutter Demo Home Page')),
body: Center(
child: ElevatedButton(
onPressed: () {
Navigator.of(context).push(MaterialPageRoute(
builder: (context) => const QRViewExample(),
));
},
child: const Text('qrView'),
),
),
);
}
}
// create class of QRViewExample
class QRViewExample extends StatefulWidget {
const QRViewExample({Key? key}) : super(key: key);
@override
State<StatefulWidget> createState() => _QRViewExampleState();
}
class _QRViewExampleState extends State<QRViewExample> {
Barcode? result;
QRViewController? controller;
final GlobalKey qrKey = GlobalKey(debugLabel: 'QR');
// In order to get hot reload to work we need to pause the camera if the platform
// is android, or resume the camera if the platform is iOS.
@override
void reassemble() {
super.reassemble();
if (Platform.isAndroid) {
controller!.pauseCamera();
}
controller!.resumeCamera();
}
@override
Widget build(BuildContext context) {
return Scaffold(
body: Column(
children: <Widget>[
Expanded(flex: 4, child: _buildQrView(context)),
Expanded(
flex: 1,
child: FittedBox(
fit: BoxFit.contain,
child: Column(
mainAxisAlignment: MainAxisAlignment.spaceEvenly,
children: <Widget>[
if (result != null)
Text(
'Barcode Type: ${describeEnum(result!.format)} Data: ${result!.code}')
else
const Text('Scan a code'),
Row(
mainAxisAlignment: MainAxisAlignment.center,
crossAxisAlignment: CrossAxisAlignment.center,
children: <Widget>[
Container(
margin: const EdgeInsets.all(8),
child: ElevatedButton(
onPressed: () async {
await controller?.toggleFlash();
setState(() {});
},
child: FutureBuilder(
future: controller?.getFlashStatus(),
builder: (context, snapshot) {
return Text('Flash: ${snapshot.data}');
},
)),
),
Container(
margin: const EdgeInsets.all(8),
child: ElevatedButton(
onPressed: () async {
await controller?.flipCamera();
setState(() {});
},
child: FutureBuilder(
future: controller?.getCameraInfo(),
builder: (context, snapshot) {
if (snapshot.data != null) {
return Text(
'Camera facing ${describeEnum(snapshot.data!)}');
} else {
return const Text('loading');
}
},
)),
)
],
),
Row(
mainAxisAlignment: MainAxisAlignment.center,
crossAxisAlignment: CrossAxisAlignment.center,
children: <Widget>[
Container(
margin: const EdgeInsets.all(8),
child: ElevatedButton(
onPressed: () async {
await controller?.pauseCamera();
},
child: const Text('pause',
style: TextStyle(fontSize: 20)),
),
),
Container(
margin: const EdgeInsets.all(8),
child: ElevatedButton(
onPressed: () async {
await controller?.resumeCamera();
},
child: const Text('resume',
style: TextStyle(fontSize: 2 ),)],)),),)],),);
}
Widget _buildQrView(BuildContext context) {
// For this example we check how width or tall the device is and change the scanArea and overlay accordingly.
var scanArea = (MediaQuery.of(context).size.width < 400 ||
MediaQuery.of(context).size.height < 400)
? 150.0
: 300.0;
// To ensure the Scanner view is properly sizes after rotation
// we need to listen for Flutter SizeChanged notification and update controller
return QRView(
key: qrKey,
onQRViewCreated: _onQRViewCreated,
overlay: QrScannerOverlayShape(
borderColor: Colors.red,
borderRadius: 10,
borderLength: 30,
borderWidth: 10,
cutOutSize: scanArea),
onPermissionSet: (ctrl, p) => _onPermissionSet(context, ctrl, p),
);
}
void _onQRViewCreated(QRViewController controller) {
setState(() {
this.controller = controller;
});
controller.scannedDataStream.listen((scanData) {
setState(() {
result = scanData;
});
});
}
void _onPermissionSet(BuildContext context, QRViewController ctrl, bool p) {
log('${DateTime.now().toIso8601String()}_onPermissionSet $p');
if (!p) {
ScaffoldMessenger.of(context).showSnackBar(
const SnackBar(content: Text('no Permission')),
);
}
}
@override
void dispose() {
controller?.dispose();
super.dispose();
}
}
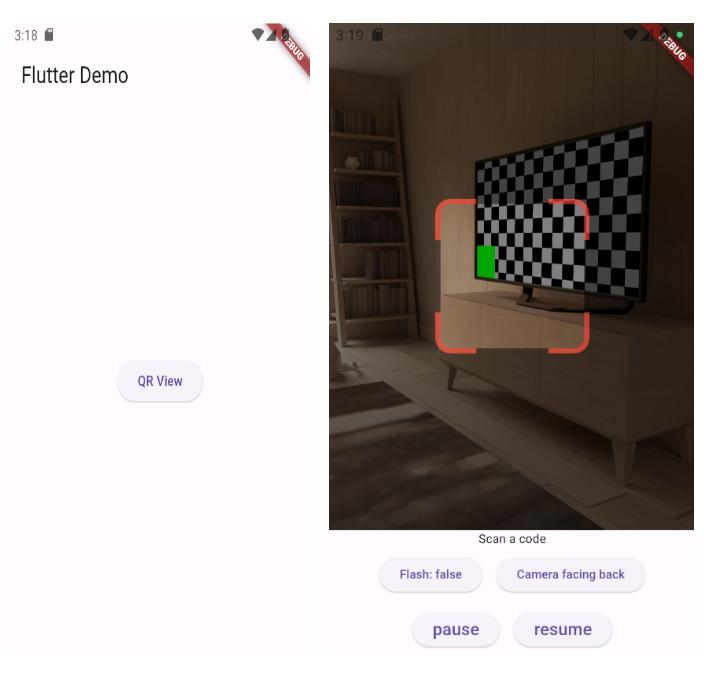
Step 4: Output of above example.
Happy coding!