Fragment Lifecycle in Android

In Android, the fragment is part of the activity. The fragment is a portion of the user interface on the screen.it is a modular Android activity that is used to create UI. The fragment is inside of activity. It is dependent on the host activity on the application. The UI is flexible on all devices. 

Let’s take one example of the Android Fragment 
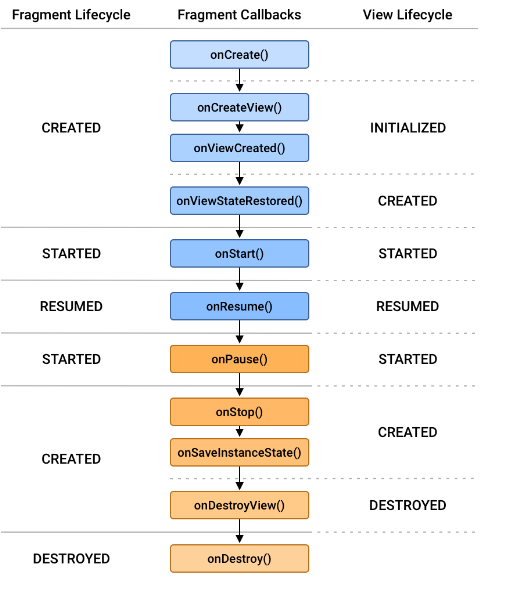

Methods of the Android Fragment.

  1. OnAttach(): This is the very first method in the life cycle of fragments.
  2. OnCreate(): when loading a fragment this method is called first and loads UI on the application.
  3. OnCreateVIew(): The system calls this method to create the user interface of the fragment. This root fragment layout returned as the view.
  4. OnViewCreated(): This method flows the hierarchy of fragments and also has been created by the fragment.
  5. OnStart (): This method to make the fragment.
  6. OnResume(): This method is called to make the visible fragment.
  7. OnPause(): This method is called when the back press or app is killed.
  8. OnStop(): This method is called when the back press or app is killed.
  9. OnDestroyView (): This method is used to clean up all kinds of resources as well as view hierarchy.
  10. OnDestroy(): It is called to perform the final cleanup of the fragment’s state.
  11. OnDetach (): This method executes the disassociate of the fragment from the host activity.

Example of LIfecycle


Step 1: Create an activity_main.xml in the layout folder. 

<?xml version="1.0" encoding="utf-8"?>

<androidx.coordinatorlayout.widget.CoordinatorLayout xmlns:android="http://schemas.android.com/apk/res/android"

xmlns:app="http://schemas.android.com/apk/res-auto"

xmlns:tools="http://schemas.android.com/tools"

android:layout_width="match_parent"

android:layout_height="match_parent"

android:fitsSystemWindows="true"

tools:context=".MainActivity2">

//appbarlayout

<com.google.android.material.appbar.AppBarLayout

android:layout_width="match_parent"

android:layout_height="wrap_content"

android:fitsSystemWindows="true">


//it is material toolbar

<com.google.android.material.appbar.MaterialToolbar

android:id="@+id/toolbar"

android:layout_width="match_parent"

android:layout_height="?attr/actionBarSize" />


</com.google.android.material.appbar.AppBarLayout>

//content main view

<include layout="@layout/content_main" />

//floating actionbutton

<com.google.android.material.floatingactionbutton.FloatingActionButton

android:id="@+id/fab"

android:layout_width="wrap_content"

android:layout_height="wrap_content"

android:layout_gravity="bottom|end"

android:layout_marginEnd="@dimen/fab_margin"

android:layout_marginBottom="16dp"

app:srcCompat="@android:drawable/ic_dialog_email" />

</androidx.coordinatorlayout.widget.CoordinatorLayout>

Step 2: Create an activity_main.kt or java in your project.

import android.os.Bundle

import com.google.android.material.snackbar.Snackbar

import androidx.appcompat.app.AppCompatActivity

import androidx.navigation.findNavController

import androidx.navigation.ui.AppBarConfiguration

import androidx.navigation.ui.navigateUp

import androidx.navigation.ui.setupActionBarWithNavController

import com.test.myapplication.databinding.ActivityMain2Binding


class MainActivity2 : AppCompatActivity() {

private lateinit var appBarConfiguration: AppBarConfiguration

private lateinit var binding: ActivityMain2Binding


override fun onCreate(savedInstanceState: Bundle?) {

super.onCreate(savedInstanceState)


binding = ActivityMain2Binding.inflate(layoutInflater)

setContentView(binding.root)


setSupportActionBar(binding.toolbar)


val navController = findNavController(R.id.nav_host_fragment_content_main)

appBarConfiguration = AppBarConfiguration(navController.graph)

setupActionBarWithNavController(navController, appBarConfiguration)


binding.fab.setOnClickListener { view ->

Snackbar.make(view, "Replace with your own action", Snackbar.LENGTH_LONG)

.setAction("Action", null)

.setAnchorView(R.id.fab).show()

}

}


override fun onSupportNavigateUp(): Boolean {

val navController = findNavController(R.id.nav_host_fragment_content_main)

return navController.navigateUp(appBarConfiguration)

|| super.onSupportNavigateUp()

}

}

Step 3: Create a first_fragment.xml in your project.

<?xml version="1.0" encoding="utf-8"?>

<androidx.core.widget.NestedScrollView xmlns:android="http://schemas.android.com/apk/res/android"

xmlns:app="http://schemas.android.com/apk/res-auto"

xmlns:tools="http://schemas.android.com/tools"

android:layout_width="match_parent"

android:layout_height="match_parent"

tools:context=".FirstFragment">


<androidx.constraintlayout.widget.ConstraintLayout

android:layout_width="match_parent"

android:layout_height="match_parent"

android:padding="16dp">


<Button

android:id="@+id/button_first"

android:layout_width="wrap_content"

android:layout_height="wrap_content"

android:text="@string/next"

app:layout_constraintBottom_toTopOf="@id/textview_first"

app:layout_constraintEnd_toEndOf="parent"

app:layout_constraintStart_toStartOf="parent"

app:layout_constraintTop_toTopOf="parent" />


<TextView

android:id="@+id/textview_first"

android:layout_width="wrap_content"

android:layout_height="wrap_content"

android:layout_marginTop="16dp"

android:visibility="gone"

android:text="@string/lorem_ipsum"

app:layout_constraintBottom_toBottomOf="parent"

app:layout_constraintEnd_toEndOf="parent"

app:layout_constraintStart_toStartOf="parent"

app:layout_constraintTop_toBottomOf="@id/button_first" />

</androidx.constraintlayout.widget.ConstraintLayout>

</androidx.core.widget.NestedScrollView>

Step 4: Create a FirstFragment.kt or java in your project.

import android.content.Context

import android.os.Bundle

import androidx.fragment.app.Fragment

import android.view.LayoutInflater

import android.view.View

import android.view.ViewGroup

import android.widget.Toast

import androidx.navigation.fragment.findNavController

import com.test.myapplication.databinding.FragmentFirstBinding


class FirstFragment : Fragment() {

private var _binding: FragmentFirstBinding? = null


// This property is only valid between onCreateView and

// onDestroyView.

private val binding get() = _binding!!


override fun onCreateView(

inflater: LayoutInflater, container: ViewGroup?,

savedInstanceState: Bundle?

): View {


_binding = FragmentFirstBinding.inflate(inflater, container, false)

Toast.makeText(requireActivity(), " FirstFragment onCreateView Called", Toast.LENGTH_LONG).show()

return binding.root


}


override fun onViewCreated(view: View, savedInstanceState: Bundle?) {

super.onViewCreated(view, savedInstanceState)


binding.buttonFirst.setOnClickListener {

findNavController().navigate(R.id.action_FirstFragment_to_SecondFragment)

}

Toast.makeText(requireActivity(), " FirstFragment onViewCreated Called", Toast.LENGTH_LONG).show()}


override fun onAttach(context: Context) {

super.onAttach(context)

Toast.makeText(requireActivity(), "FirstFragment onAttach Called", Toast.LENGTH_LONG).show()

}

//create method

override fun onCreate(savedInstanceState: Bundle?) {

super.onCreate(savedInstanceState)

Toast.makeText(requireActivity(), "FirstFragment onCreate Called", Toast.LENGTH_LONG).show()

}

//start method

override fun onStart() {

super.onStart()

Toast.makeText(requireActivity(), "FirstFragment onStart Called", Toast.LENGTH_LONG).show()

}

//stop method

override fun onStop() {

super.onStop()

Toast.makeText(requireActivity(), "FirstFragment onStop Called", Toast.LENGTH_LONG).show()

}

//resume method 

override fun onResume() {

super.onResume()

Toast.makeText(requireActivity(), "FirstFragment onResume Called", Toast.LENGTH_LONG).show()

}

//detach method

override fun onDetach() {

super.onDetach()

Toast.makeText(requireActivity(), "FirstFragment onDetach Called", Toast.LENGTH_LONG).show()

}

//destroy method

override fun onDestroy() {

super.onDestroy()

Toast.makeText(requireActivity(), "FirstFragment onDestroy Called", Toast.LENGTH_LONG).show()

}

//destroy view method

override fun onDestroyView() {

super.onDestroyView()

Toast.makeText(requireActivity(), "FirstFragment onDestroyView Called", Toast.LENGTH_LONG).show()

_binding = null

}

}


 Step 5: Create a second_fragment.xml in your mobile app development project.

<?xml version="1.0" encoding="utf-8"?>

<androidx.core.widget.NestedScrollView xmlns:android="http://schemas.android.com/apk/res/android"

xmlns:app="http://schemas.android.com/apk/res-auto"

xmlns:tools="http://schemas.android.com/tools"

android:layout_width="match_parent"

android:layout_height="match_parent"

tools:context=".SecondFragment">


<androidx.constraintlayout.widget.ConstraintLayout

android:layout_width="match_parent"

android:layout_height="match_parent"

android:padding="16dp">


<Button

android:id="@+id/button_second"

android:layout_width="wrap_content"

android:layout_height="wrap_content"

android:text="@string/previous"

app:layout_constraintBottom_toTopOf="@id/textview_second"

app:layout_constraintEnd_toEndOf="parent"

app:layout_constraintStart_toStartOf="parent"

app:layout_constraintTop_toTopOf="parent" />


<TextView

android:id="@+id/textview_second"

android:layout_width="wrap_content"

android:layout_height="wrap_content"

android:layout_marginTop="16dp"

android:visibility="gone"

android:text="@string/lorem_ipsum"

app:layout_constraintBottom_toBottomOf="parent"

app:layout_constraintEnd_toEndOf="parent"

app:layout_constraintStart_toStartOf="parent"

app:layout_constraintTop_toBottomOf="@id/button_second" />

</androidx.constraintlayout.widget.ConstraintLayout>

</androidx.core.widget.NestedScrollView>


Step 6: Create a SecondFragment.kt or java in your project.

import android.content.Context

import android.os.Bundle

import androidx.fragment.app.Fragment

import android.view.LayoutInflater

import android.view.View

import android.view.ViewGroup

import android.widget.Toast

import androidx.navigation.fragment.findNavController

import com.test.myapplication.databinding.FragmentSecondBinding


class SecondFragment : Fragment() {

private var _binding: FragmentSecondBinding? = null

private val binding get() = _binding!!


override fun onCreateView(

inflater: LayoutInflater, container: ViewGroup?,

savedInstanceState: Bundle?

): View {


_binding = FragmentSecondBinding.inflate(inflater, container, false)

Toast.makeText(requireActivity(), "SecondFragment onCreateView Called", Toast.LENGTH_LONG).show()

return binding.root


}


override fun onViewCreated(view: View, savedInstanceState: Bundle?) {

super.onViewCreated(view, savedInstanceState)

Toast.makeText(requireActivity(), "SecondFragment onViewCreated Called", Toast.LENGTH_LONG).show()

binding.buttonSecond.setOnClickListener {

findNavController().navigate(R.id.action_SecondFragment_to_FirstFragment)

}

}


override fun onAttach(context: Context) {

super.onAttach(context)

Toast.makeText(requireActivity(), "SecondFragment onAttach Called", Toast.LENGTH_LONG).show()

}


override fun onCreate(savedInstanceState: Bundle?) {

super.onCreate(savedInstanceState)

Toast.makeText(requireActivity(), "SecondFragment onCreate Called", Toast.LENGTH_LONG).show()

}


override fun onStart() {

super.onStart()

Toast.makeText(requireActivity(), "SecondFragment onStart Called", Toast.LENGTH_LONG).show()

}


override fun onStop() {

super.onStop()

Toast.makeText(requireActivity(), "SecondFragment onStop Called", Toast.LENGTH_LONG).show()

}


override fun onResume() {

super.onResume()

Toast.makeText(requireActivity(), "SecondFragment onResume Called", Toast.LENGTH_LONG).show()

}


override fun onDetach() {

super.onDetach()

Toast.makeText(requireActivity(), "SecondFragment onDetach Called", Toast.LENGTH_LONG).show()

}


override fun onDestroy() {

super.onDestroy()

Toast.makeText(requireActivity(), "SecondFragment onDestroy Called", Toast.LENGTH_LONG).show()

}


override fun onDestroyView() {

super.onDestroyView()

_binding = null

}

}

Step 7: Create a navgraph.xml in the layout folder.

<?xml version="1.0" encoding="utf-8"?>

<navigation xmlns:android="http://schemas.android.com/apk/res/android"

xmlns:app="http://schemas.android.com/apk/res-auto"

xmlns:tools="http://schemas.android.com/tools"

android:id="@+id/nav_graph"

app:startDestination="@id/FirstFragment">

//first fragment

<fragment

android:id="@+id/FirstFragment"

android:name="com.test.myapplication.FirstFragment"

android:label="@string/first_fragment_label"

tools:layout="@layout/fragment_first">

// this required to move other fragment

<action

android:id="@+id/action_FirstFragment_to_SecondFragment"

app:destination="@id/SecondFragment" />

</fragment>

<fragment

android:id="@+id/SecondFragment"

android:name="com.test.myapplication.SecondFragment"

android:label="@string/second_fragment_label"

tools:layout="@layout/fragment_second">

// this required to move other fragment

<action

android:id="@+id/action_SecondFragment_to_FirstFragment"

app:destination="@id/FirstFragment" />

</fragment>

</navigation>

Step 8: Image of navigraph.


Happy coding!


365Bloggy May 10, 2024
Share this post
Tags
SUBSCRIBE THIS FORM


Archive