Design Login Page UI flutter

 When developing applications using Flutter, the focus is on Widgets, which are the building components of Flutter apps. The app's User Interface is made up of several simple widgets, each with a specific function. In this tutorial, we will design a simple login page that can be entirely customised, including the size, colour, and size of the Login button of Mobile application.

In this article, you will learn how to create your Login Screen. So let’s take one example of the Login Screen of Mobile application.


Step-by-Step Implementation

Step 1: Create a New Project in Android Studio (File >new flutter project)


Step 2: Adding material package

Import method the runApp method in the main function call first while run the application.

 import 'package:flutter/material.dart';

 void main() {

     runApp(RunMyApp());

 }

Step 3: Creating a stateless widget 

 We can create a stateless widget that contains MaterialApp widget,AppBar,etc.

 class RunMyApp extends StatelessWidget {

     const RunMyApp({super.key});  

    @override

    Widget build(BuildContext context) {

    return MaterialApp(home);

     }

 }

Step 4: Create a Backgound of login page in Backgound.dart file.
 import 'package:flutter/cupertino.dart';
import 'package:flutter/material.dart';

class Background extends StatelessWidget {
final Widget child;

const Background({
Key? key,
required this.child,
}) : super(key: key);

@override
Widget build(BuildContext context) {
Size size = MediaQuery.of(context).size;
return Container(
color: Colors.white,
width: double.infinity,
height: size.height,
child: Stack(
alignment: Alignment.center,
children: <Widget>[
Positioned(
top: 0,
right: 0,
child: Image.asset(
"assets/images/top1.png",
width: size.width
),
),
Positioned(
top: 0,
right: 0,
child: Image.asset(
"assets/images/top2.png",
width: size.width
),
),

Positioned(
bottom: 0,
right: 0,
child: Image.asset(
"assets/images/bottom1.png",
width: size.width
),
),
Positioned(
bottom: 0,
right: 0,
child: Image.asset(
"assets/images/bottom2.png",
width: size.width
),
),
child
],
),
);
}
}


Step 5: Create a HomeScreen.dart file in lib folder .
 import 'package:flutter/material.dart';
import 'package:untitled/screen/Background.dart';

void main() {
runApp(HomeScreen());
}

class HomeScreen extends StatelessWidget {
const HomeScreen({super.key});

@override
Widget build(BuildContext context) {
Size size = MediaQuery.of(context).size;
return Scaffold(
body: Background(
child: Container(
child: Column(
mainAxisAlignment: MainAxisAlignment.center,
children: [
Container(
child: Text("Login",
style: TextStyle(
decoration: TextDecoration.none,
fontSize: 30,
color: Colors.blue)),
),
SizedBox(height: size.height * 0.03),
Container(
alignment: Alignment.center,
margin: EdgeInsets.symmetric(horizontal: 40),
child: TextField(
decoration: InputDecoration(labelText: "Username"),
obscureText: true,
),
),
SizedBox(height: size.height * 0.03),
Container(
alignment: Alignment.center,
margin: EdgeInsets.symmetric(horizontal: 40),
child: TextField(
decoration: InputDecoration(labelText: "Password"),
obscureText: true,
),
),
SizedBox(height: size.height * 0.03),
Container(
alignment: Alignment.centerRight,
margin: EdgeInsets.symmetric(horizontal: 40, vertical: 10),
child: MaterialButton(
onPressed: () {},
shape: RoundedRectangleBorder(
borderRadius: BorderRadius.circular(80.0)),
textColor: Colors.white,
padding: const EdgeInsets.all(0),
child: Container(
alignment: Alignment.center,
height: 50.0,
width: size.width * 0.5,
decoration: new BoxDecoration(
borderRadius: BorderRadius.circular(80.0),
gradient: new LinearGradient(colors: [
Color.fromARGB(255, 135, 137, 194),
Color.fromARGB(255, 56, 85, 230)
])),
padding: const EdgeInsets.all(0),
child: Text(
"LOGIN",
textAlign: TextAlign.center,
style: TextStyle(fontWeight: FontWeight.bold),
),
),
),
),

Container(
alignment: Alignment.centerRight,
margin: EdgeInsets.symmetric(horizontal: 40, vertical: 10),
child: GestureDetector(
onTap: () => {

},
child: Text(
"Don't Have an Account? Sign up",
style: TextStyle(
fontSize: 12,
fontWeight: FontWeight.bold,
color: Color(0xFF2661FA)
),
),
),
)
],
),
)),
);
}
}
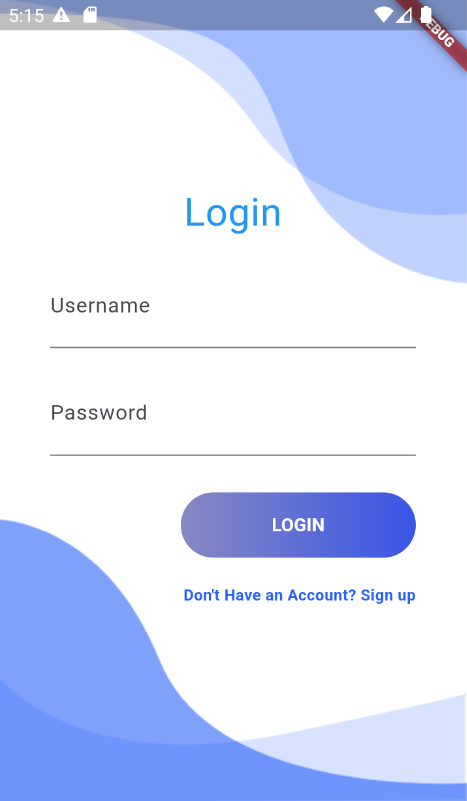
Step 6: Output of above example  .


Happy coding!

365Bloggy June 10, 2024
Share this post
Tags
SUBSCRIBE THIS FORM


Archive